Arrange your granny squares before joining by counting each color combination, laying out the full grid and saving a position map. Begin with the squares you have, then choose whether you want an orderly repeat, loose scattering or deliberate blocks of color. There is no single correct arrangement: the useful test is whether you like the whole blanket and can reproduce the layout when you join it.
Give each square combination a label
Use A, B and C for three different square designs, even if each contains several colors. Write down how many finished squares belong to each group. For a varied stash blanket, you could group by the outer-round color or by the shade that stands out most, provided you use the same rule throughout.
First settle the number of rows and columns with the granny-square quantity guide. This page helps place colors within that grid; it does not determine the finished size. Keep incomplete squares separate so your inventory does not promise pieces you still need to make.
Try a counted layout before moving everything around
Imagine 24 completed squares: eight A, eight B and eight C. The four-row, six-column plan below uses each design twice per row. Moving the starting letter one place along in each successive row makes diagonal runs. Matching letters do not share a horizontal or vertical edge in this particular layout, though they do meet diagonally.
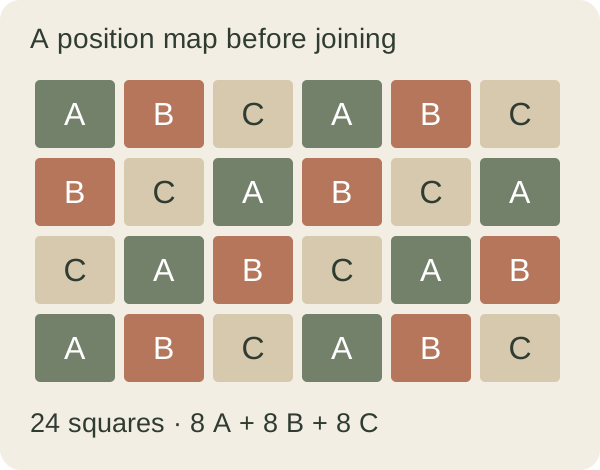
Prefer broad bands? With the same inventory, try two columns of A, two of B and two of C across all four rows. That also uses eight of each design. Neither arrangement requires extra squares. Compare the two before buying more yarn to solve a placement problem.
Adjust the map to your actual inventory
If you have twelve A, eight B and four C, the equal-repeat example will not fit. One option is to distribute one C per row first, then fill the remaining positions with A and B. Count each row and cross off pieces from your inventory as you place them. An irregular layout can be intentional; it does not need to imitate a perfectly even repeat.
For a scattered appearance, look for unintended concentrations of your brightest or darkest square. Swap two positions and step back to compare. Keep a version you like before trying another, so you do not lose a good arrangement in endless rearranging.
Check the real squares together
Lay out actual squares where you can see the whole arrangement. Lion Brand's color-combination guidance recommends testing colors in the stitch you intend to use. Finished squares make that comparison more useful than yarn balls alone. Include a sample of the intended joining color if you have one.
Look at the outer rounds as well as the centers: the edges are what meet the joins. If you are unsure why two combinations blend together, use the separate color-contrast guide. Here, concentrate on where each completed square belongs.
Save the arrangement so joining stays straightforward
Photograph the full layout and draw a small letter grid. Mark the top edge and number rows from top to bottom, columns from left to right. A position such as R2–C5 is less ambiguous than “the green one near the middle.” For motifs with a visible direction, add an arrow to the map.
If you pack the squares away, label each row and keep its left-to-right order explicit. Follow your pattern's instructions for which face and edge to join; the map records placement, not a joining technique. Before starting the next row, compare its first and last square with the photo.
Finally, reserve yarn for the joins and border. The calculator below estimates fabric yarn from a representative swatch; it does not convert this color map into a per-color shopping list.
Keep planning your blanket
Examples illustrate the arithmetic; they are not physical project tests. Send a correction.