For a rectangular blanket worked in rows, multiply the body length you want by your measured rows per unit of length. Then adjust to a valid stopping row in the pattern. Use row gauge from the actual yarn and stitch, and keep separately worked borders out of the body length.
Picture the full length, then separate the parts
Measure a blanket you enjoy using, or mark out your preferred coverage. A reading-chair throw and a gift intended for a bed may need different proportions. Our blanket size guide helps you choose dimensions without relying on a size name alone.
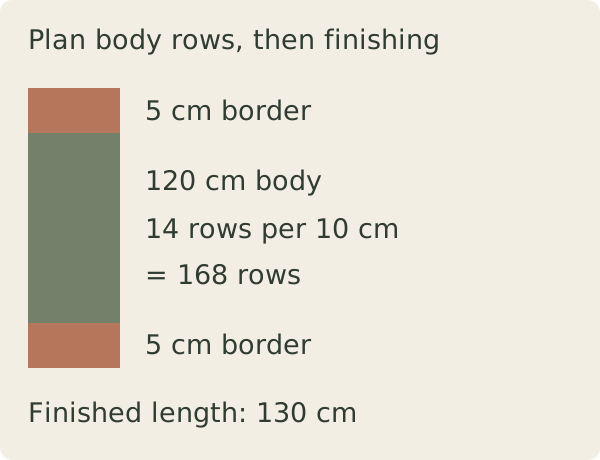
If you want a finished length of 130 cm and plan a 5 cm border at each short end, the body target is 130 − 5 − 5 = 120 cm. Borders on the long sides affect width instead. If you add fringe, record its reach separately from the crocheted fabric.
Measure rows over a useful sample
Make a sample in your intended stitch, yarn and hook. The Craft Yarn Council recommends comparing a gauge swatch with the pattern. Record rows and their measured height in the same preparation state you plan for the finished blanket. Keep your measurement away from distorted edges and do not stretch the sample to a preferred number.
Suppose 14 representative rows measure 10 cm. Your rate is 14 ÷ 10 = 1.4 rows per cm. For a 120 cm body, the first estimate is 120 × 1.4 = 168 rows. This is an original arithmetic example, not a tested blanket pattern.
Fit the number to the actual repeat
Read which rows repeat and how the pattern starts and finishes. The Craft Yarn Council’s pattern-reading reference explains repeat notation; your particular pattern determines valid stopping points.
If the entire body repeats every four rows and has no separate setup or finishing rows, 168 is convenient: 42 complete repeats. A 118 cm body at the same row gauge suggests 165.2 rows. The neighboring complete repeats are 164 rows (about 117.1 cm) and 168 rows (120 cm). Choose based on your size tolerance and available yarn.
| Body option | At 14 rows per 10 cm |
|---|---|
| 164 rows / 41 repeats | About 117.1 cm |
| 168 rows / 42 repeats | 120 cm |
If there are setup and finishing rows, count them separately. For example, two setup rows plus a repeating four-row section gives totals of 2 + 4n, where n is a whole number of repeats, before any final rows. Do not round the total to a multiple of four and accidentally remove those two setup rows.
For mixed row heights, measure complete repeats
A sequence containing different stitch heights may be better measured as a complete vertical repeat. If one full repeat measures 3 cm in a representative sample, 40 such repeats suggest 120 cm, before separate setup or final sections. Measure several repeats together when possible, then divide their total height by the number of repeats.
Keep the planned stripe sequence beside the row plan. Finishing in the middle of a color band can change the appearance you intended. Our stripe budgeting guide connects the color sequence to each yarn reserve; a row count alone cannot confirm that you have enough of every shade.
Use the count as a checkpoint while you work
At complete repeats, lay the body flat and measure its current length in a consistent state. Compare that with the plan. If the measurements drift, check the row count, gauge and construction before deciding to add rows. If the width also changes, use the width troubleshooting guide first.
When yarn is limited, use the stash planner below for a body-length estimate, then translate that length into complete repeats. Reserve finishing yarn first. These estimates do not apply directly to diagonal corner-to-corner rows, growing rounds or shaped sections, where one more row does not add a uniform strip of fabric. Follow the construction-specific pattern there.
Use the calculator ↗Examples illustrate the arithmetic; they are not physical project tests. Send a correction.